How To Setup Custom Robots Header Tags On Blogger
What are Custom Robots Header Tags?
Custom robots header tags are tags which are specially design for easy crawling and indexing of our site by search engine.
it is so much important to have properly defined "custom robots header tags" which help to communicates with the search engine crawlers for easy access to our indexable and non indexable post there by increasing our search engine visibility.
So today I will share with you on how you can easily setup custom robots header tags on your blogger dashboard.
How to Set up Custom Robots Header Tags on
Blogger?
Every site owner be it blog or website wishes to appear on the first page of search engine so as to increase the site exposure and the get more organic traffic.
Here is a perfect guide for you, I recommend
that you follow this guide and enable the
custom robots header tags for maximum
search engine visibility.
Google provides a ready-made setup to use
them but before getting to know the process
of setting up custom robots header tags on
Blogger, you should know what the "custom
robots header tags" are.
Custom Robots Header Tags and Purpose
In Blogger, you are going to deal with the
following custom robots header tags.
all – If you set this tag, crawlers are not
bound by any constraints. They can freely
crawl, index and render your content visible to search engine thereby making all the webpage on your blog visible to search engine.
Recommended : How to Create Lite Version App For Blog without Programming Idea
How To Add Random Posts Widget To Blogger
noindex – if you enable the noindex not all your content will be visible to search engines.
your can restrict the crawler from rendering a webpage on your blog visible by effectively and properly making use of noindex tag
notice. Even if you don’t share the URL of
your personal blog with anybody, chances
are people will come to it from search
results. On such a scenario, you can use
noindex tag as it prevents search engines
from indexing the pages.
nofollow – Nofollow and dofollow tags are
for outbound links. Dofollow is the default
robot tag for all your outbound links. That
means the search engines can sneak upon
the pages you linked to. If you don’t want
search bots to look through your links,
addition of a nofollow tag must help you.
none – none combines the features of both
noindex and nofollow tags. The crawlers
will neither index your pages nor skim
through the links.
noarchive – You might have noticed a
cached label with most of the website links
on SERPs. It shows that Google has
captured a copy of your site into their
server to display in case it goes down. That
being said, the noarchive tag turns off
cached version in search pages.
nosnippet – The text snippets in search
results help people find what’s on the
webpage. If you want to keep the content
exclusive, you can turn this header tag on.
noodp – Open Directory Project or Dmoz is
a man-made directory of websites. Google
use the information from there sometimes.
You can turn it off with this tag if you want
to.
notranslate – Do you want to disable
translation on your site? Then use
no translate for the exact purpose.
noimageindex – If you allow Google to
index your images, people may have access to it thereby stealing it and making
use of it on their own websites. To prevent that,
you can keep the images non indexed by using
noimageindex tag.
unavailable_after – In Blogger, you will get a
field right to this tag. So, the webpage will
be non indexed after this time.
With that being said, let’s go to the practical aspect.
How to Setup Custom Robots Header Tags?
As you know, we are talking about setting up
robots tags on blogger. Follow the steps given
below to proceed with this.
Step 1: Go to " blogger.com " and sign in to your
account. From your dashboard choose the blogs for which you
want to modify robots tags.
Similar post : How To Easily Access And Edit Blogger Template On Android Mobile Device
How To Convert Personal Facebook Account To A Page And Get More Likes
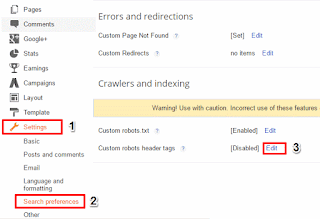
Step 2: Then go to Settings >> Search
preference. There you can see a setting called
Custom robots header tags under Crawlers and
Indexing. Click the Edit link to the right of it.
Step 3: At this step, you will notice two radio
buttons. Obviously, the first one should be your pick.
Step 4: Now, you will get a set of checkboxes. But don’t get intimidated! It may feel like a complicated one, but it’s not. You can set them on your own by reading the “Custom Robots Header Tags and Purpose” once again. Or, just follow the same settings I chose (refer to the image given below) and hit Save changes.
NOTE:
Don’t tick noindex checkbox until and unless you are sure about it because doing the same will pull your website off from search engine result pages (SERPs).
Any issue? Comment below…
Labels: Blogger Tutorials, Blogging Tips, How To's, Robots header tags


3 Comments:
Nice .very useful for freshers UI online course hyderabad
I really enjoy simply reading all of your weblogs. Simply wanted to inform you that you have people like me who appreciate your work. Definitely a great post. Hats off to you! The information that you have provided is very helpful. custom lapel pins
Glad to chat your blog, I seem to be forward to more reliable articles and I think we all wish to thank so many good articles, blog to share with us. 婚介
Post a Comment
Subscribe to Post Comments [Atom]
<< Home